PART 1 - Track terrain base
1) OK, get your blank track from here.
2) Next, get a program called L3DT from here. Install it and open it up
3) Go File > New Project. Select Design/Inflate and click next. Leave the next slide how it is, and click next. Have a play around with the controls in the next slide when get serious about making a track, but for now, leave it as it is. On the next slide, have both Design Map and Heightfield checked. Hit next, and the terrain will begin rendering (may take a while).
4) Now, once your map is rendered, it will probably appear as a design map. To change it to the heightfield, which is what we want, go View > Display map, then select heightfield.
5) To make the track the same scale as in game, first go Operations > Heightfield > Resize Heightfield. Change both to 1025. Next, go Operations > Heightfield > Change Horizontal scale. The stock blank track has 1 pixel=2ft. As this want metres, 1ft= 0.3m, hence 2ft=0.6m. Put 0.6 m into this box. If you want to change the horizontal scaling (especially after step 6), go Operations > Heightfield > Change vertical scale. Change this to suit you requirements (but remember 1ft=0.3m)
6) Now, to see this track in 3D form, click on the EDIT button (the one with the pencil). The terrain will look blocky in this, but rest assure, it won't be like this in game. Now, in this mode, you can edit your terrain as you like, but I leave that up to you to learn. But controls for this mode are-
W=Forward
A=Strafe Left
D=Strafe Right
S=Backwards
Hold Right Click= Rotate view
Mouse Scroll= Change size of editing tool
E=Up
R=Down
Tab=Turbo
Hit the exit button to leave, even if you have done stuff to the terrain. If you did stuff, refresh the display map by View > Refresh
7) OK, time for exporting. But before we do, go back to Operations > Heightfield > Change Vertical Scale. Write down the min and max altitude, as you will need them later.
Now go File > Export > Export Active Map. Choose file format as PNG, call it terrain, choose where you want it saved. Make sure the size is 1025x1025. Then hit export, and voila! you have your map.
8- Now, put this terrain.png into your track folder, and it will replace your old one. Now, open up terrain.hf in a text editor. There should be four numbers. This is how they are set out.
Power Scale MinAlt MaxAlt Power should be left alone. Scale is ft/pixel (stock=2). We are interested in Min Altitude and Max Altitude. Put in the values I asked you to write down before. Save the file. Now, go into the game, and select your track, go into the editor, and refresh the shading of the map by setting smooth to a very small number, and applying it to the whole track.
If the track if very rough, even to the point where it will slow your frame rate, set focus to 1, set strength to 2 or 4, and apply to the whole map.
And there you go, you have your basic terrain.
PART 2 - Making Jumps Using In-Game Editor
Open up your track in MX Simulator. Draw out a track you would like using the stock tiles of the game.
Click on the Gradient Placement tab, and place the centre of the circle where you would like the jump to begin. Then, place the edge of the circle where you would like the jump to finish. Now, go to Gradient Edit. As we already have a terrain in this, there will already be a ‘cross section’ appeared. Hit ‘f’ to get rid of this graph (this will not effect the terrain).
Here is my technique for making jumps. In Gradient Edit mode, zoom in (+, - to zoom out) and select the first circle. Go across to the menu, and click ‘Segment Type’ so it changes to curve. I usually add 3 points for the upramp, one just after the upramp, and one for the downramp, like so-
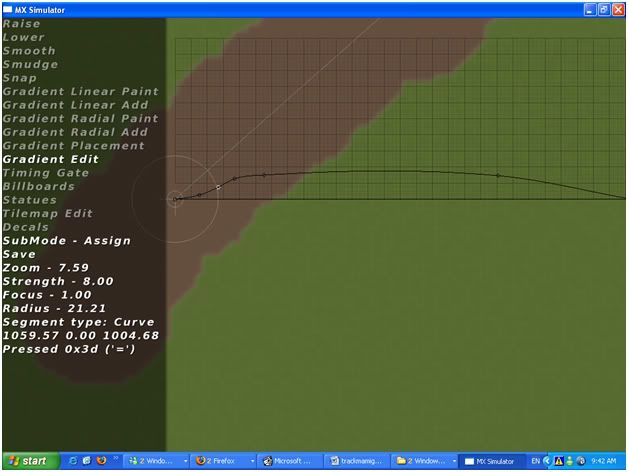
Click on the point as selected in the above pic. Change the segment type for this to line. This will give a smooth upramp. If you want the top of the jump to be flat, click on the point just after the upramp, and change segment type to line. This is your jumps shape, now, to put it in.
Select ‘Linear ADD’, set Focus to 0.75, 0.88 or 1.00. Zoom out and change the radius so it is slightly bigger than the track width. Then, just draw along the track path until the jump is made. Exit the editor mode and try the jump out. If you aren’t happy with it, go back to editor, and change Linear Add mode to anything else, and then hit backspace. Your jump shape will still be in the gradient editor, so just fiddle with it a bit until you get the shape wanted. After you like the jump, clean it up a bit using 'Smooth'. Set focus to 0.13, set strength to 1, 2 or 4, smooth sides of jumps, and the 'square edges' and the beginning and end of the jumps.
Note – Backspace only works for the last 5 things done (includes one click of Raise, Lower or Smooth). If you don’t change from Linear Add to anything else, it will delete the jump you just made, plus the one before hand, which is a pain, because then you have to draw that one again.
Tip- Make sure Caps Lock is off, or things like 'f' for flatten, or 's' for save will not work
Tutorial on berms will be next.