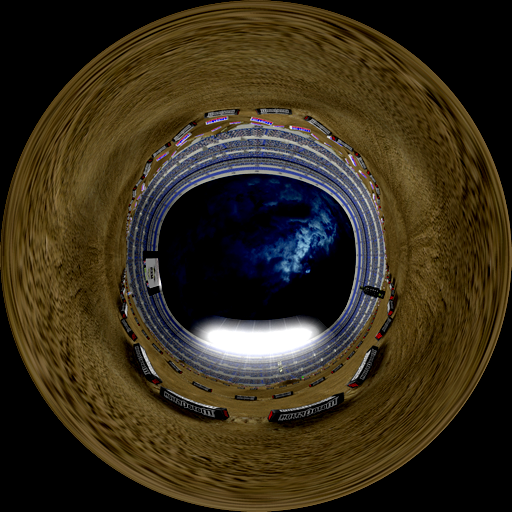
This new method was developed by JLV, and allows for much more detailed environment maps, which take into consideration surrounding objects. The following is an example of what can be made using this method. This was created for the 2010 AMA SX tracks.
My tutorial is a modified version of the instructions included by JLV.
Lets begin!
Tools Required:
- POVray
- This Script
- Any snapshot since 2010-11-11
- Install POVray
- Unzip skyenv.zip. A bunch of files will be within the skyenv folder
- Open makeskybox.bat in a text editor (open makeskybox.sh for Linux). Change the directory in the first line to wherever pvengine.exe or pvengine64.exe is on your computer. Eg, I changed mine from
set povray="c:\Program Files\POV-Ray for Windows v3.6\bin\pvengine"
to
set povray="C:\Users\DJ\AppData\Roaming\POV-Ray\v3.6\bin\pvengine64"
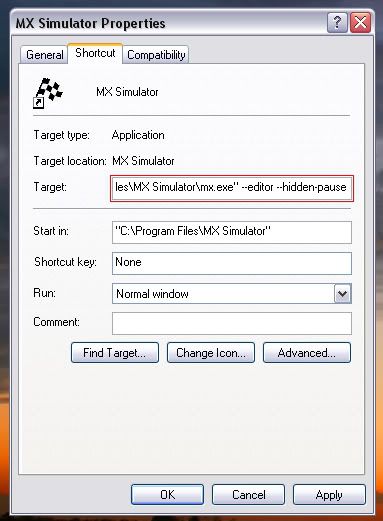
Save the bat file. - Add --width 1024 --height 1024 --hidden-hud to the command line of your game shortcut.
The game will have to be in windowed mode for this to work. The game should appear as a square box on the screen. DO NOT MAXIMIZE THE WINDOW - Change the Field of View to 90 in the graphics menu, or by typing '/fov 90' into the chat.
- Playback a demo of your track. Use the free-roam camera, and place it somewhere your bike would ride. Ie place it on the track, about 4ft off the ground
- Type in the following underlined text, one at a time, into the chat. Once the camera has repositioned itself, take a screenshot (by pressing 's' or whatever you have it set to). Do this for all 6 orientations. Take note of what each image is called (eg 'screenshot6.png'). Afterwards, rename it to the corresponding name given with each camera orientation below:
ss-n.png: /camangle 180 0
ss-e.png: /camangle 90 0
ss-s.png: /camangle 0 0
ss-w.png: /camangle -90 0
ss-u.png: /camangle 180 90
ss-d.png: /camangle 180 -90
- Place all of the renamed images into the same folder as the makeskybox.bat file
- Run makeskybox.bat
- Once sky-env.png is created, feel free to do a little touching up of the colours in an image editing software. Make the colours a little deeper.
sky_env @yourtrackfoldername/sky-env.png
Tips
- Turn flares off when doing this. Draw them in with your image editor.
- The reflection image will come out too bright most likely. Either change the assumed_gamma from 1 to something like 2 (in the skybox.pov file), or edit the picture in your image editor.
VOILA!