Custom MipMapping
Posted: Thu Mar 29, 2012 5:10 am
Custom mipmapping can be useful for two reasons:
1) To make the texture look sharp at a distance
2) To prevent the alpha from bleeding in at a distance, causing the object to disappear.
The thing is, manually placing the smaller mipmaps in photoshop is a pain in the ass. Luckily, if you have installed the nVidia normal map plugin for Photoshop, you will also have an automatic mipmap creator.
Unfortunately, this has two flaws:
1) It doesn't print them out in the same format as what MXS uses
2) It doesn't work with alpha
In this tutorial, I will show you how to get around these issues. I don't think its necessary for bikes and rider gear (maybe for normal maps I guess).
----------------------
2) For the quick way to get the format right, you first need to flip the canvas horizontally, then rotate it 90° counter-clockwise.
3) Go File>Scripts>NVIDIA_Mipster. Let the program do its thing
4) You then need to return the texture to its original orientation. Rotate the canvas 90° clockwise, and flip horizontal. You will end up with something like this:
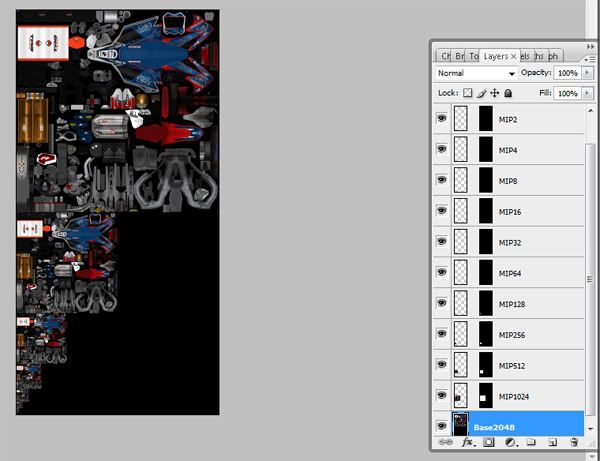
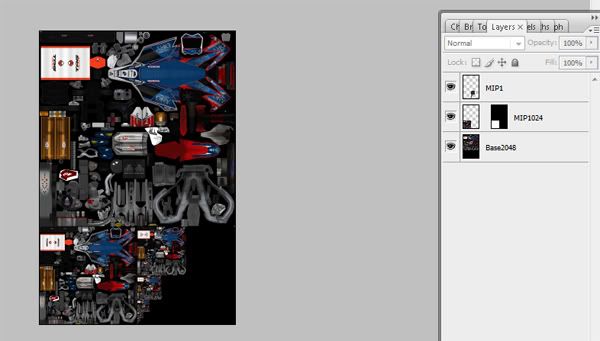
5) The main image and the first level smaller are in the correct place (i.e Base2048 and MIP1024 in the above image). The remaining images are lined up correctly, but are positioned wrong. Simply merge the remaining layers (i.e MIP512 to MIP1 in the above image). Slot this merged image into the corner created between Base2048 and MIP1024. Once that is done, crop the entire image from the top of Base2048 to the bottom of MIP1024 (in this case, the image would be 2048 pixels wide, 3072 pixels tall). The result should look something like this:
6) You can modify the picture before or after step 5 (e.g applying a sharpen filter).
7) Save the image. To make the custom mipmap work in game, you need to include a text file with the .png with [mip_custom] written in it. This file should be the exact same name as the .png, with .info added at the end. E.g, if my image was called crf250-Carlton.png, then the .info file would be called crf250-Carlton.png.info
----------------------
2) Make a new layer, and fill with flat black.
3) Ctrl+Click on your texture layer, so the alpha selection of your texture is made. Fill this selection with white into the black layer.
4) Now, for your original texture, you want to remove the alpha, otherwise the mipmapper will fill it in with white, which will look bad. You can either fill the background with a single colour, or if your texture varies more in colour, you might want to copy it over into GIMP, and run it through the value propagate filter (this isn't available in Photoshop). To value propagate, go Filters>Distorts>Value Propagate. Make the mode "More Opaque", then hit ok. Keep repeating this by hitting ctrl+f until the entire image is filled. Copy this picture back into photoshop. The two layers should look like this (top is the alpha channel, bottom is the texture):

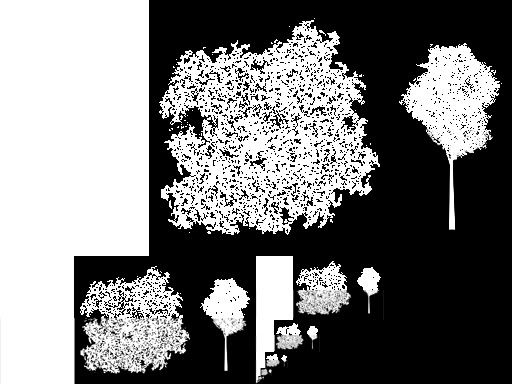
5) Perform the 1st part of the tute on both layers. For the alpha component, you want to remove the blurred edges. To do this, I usually go Image>Adjustments>Threshold to the whole image. Sometimes, you have to play around with the amount of threshold used, as it can sometimes look shit in game. Also, sometimes its best to adjust the threshold on individual mip levels. This image shows a comparison between the threshold and non-threshold images. I only did it to the first five levels. As you can see, the upper half has sharp edges, the lower half is blurry:
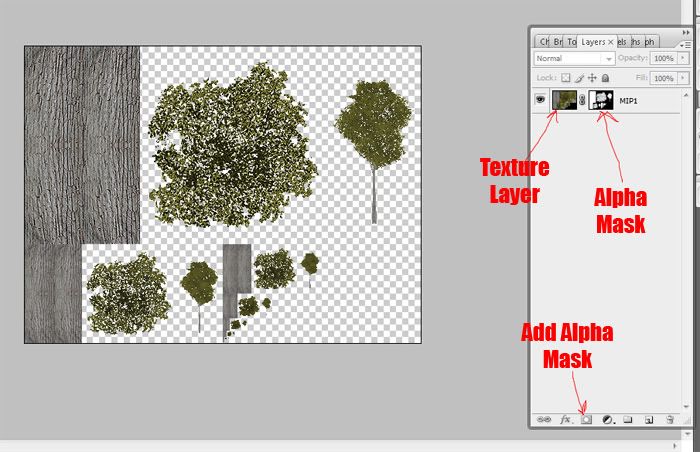
6) Once your happy with both of the alpha and texture mips, flatten both images. Copy the alpha mip image. Go to the texture, and add an alpha mask (select the texture layer, then go to the bottom of the texture list, and click on the rectangle with a circle on it). Alt+click on the alpha mask (this will result on the image going white). Paste your alpha mip in there. Click on the texture layer, and voila, the alpha and texture mips are combined! The following picture shows the final product, plus where some of the features mentioned above are located:
7) Save it, and make the .info file as described before.
----------------------
[center]QUESTIONS?????[/center]
1) To make the texture look sharp at a distance
2) To prevent the alpha from bleeding in at a distance, causing the object to disappear.
The thing is, manually placing the smaller mipmaps in photoshop is a pain in the ass. Luckily, if you have installed the nVidia normal map plugin for Photoshop, you will also have an automatic mipmap creator.
Unfortunately, this has two flaws:
1) It doesn't print them out in the same format as what MXS uses
2) It doesn't work with alpha
In this tutorial, I will show you how to get around these issues. I don't think its necessary for bikes and rider gear (maybe for normal maps I guess).
----------------------
Getting the format right
1) For this part, we will focus on a texture that doesn't use alpha, just to keep things simple. Start off by flattening your texture to a single layer. 2) For the quick way to get the format right, you first need to flip the canvas horizontally, then rotate it 90° counter-clockwise.
3) Go File>Scripts>NVIDIA_Mipster. Let the program do its thing
4) You then need to return the texture to its original orientation. Rotate the canvas 90° clockwise, and flip horizontal. You will end up with something like this:
5) The main image and the first level smaller are in the correct place (i.e Base2048 and MIP1024 in the above image). The remaining images are lined up correctly, but are positioned wrong. Simply merge the remaining layers (i.e MIP512 to MIP1 in the above image). Slot this merged image into the corner created between Base2048 and MIP1024. Once that is done, crop the entire image from the top of Base2048 to the bottom of MIP1024 (in this case, the image would be 2048 pixels wide, 3072 pixels tall). The result should look something like this:
6) You can modify the picture before or after step 5 (e.g applying a sharpen filter).
7) Save the image. To make the custom mipmap work in game, you need to include a text file with the .png with [mip_custom] written in it. This file should be the exact same name as the .png, with .info added at the end. E.g, if my image was called crf250-Carlton.png, then the .info file would be called crf250-Carlton.png.info
----------------------
Handling Alpha
1) Once again, flatten your image.2) Make a new layer, and fill with flat black.
3) Ctrl+Click on your texture layer, so the alpha selection of your texture is made. Fill this selection with white into the black layer.
4) Now, for your original texture, you want to remove the alpha, otherwise the mipmapper will fill it in with white, which will look bad. You can either fill the background with a single colour, or if your texture varies more in colour, you might want to copy it over into GIMP, and run it through the value propagate filter (this isn't available in Photoshop). To value propagate, go Filters>Distorts>Value Propagate. Make the mode "More Opaque", then hit ok. Keep repeating this by hitting ctrl+f until the entire image is filled. Copy this picture back into photoshop. The two layers should look like this (top is the alpha channel, bottom is the texture):
5) Perform the 1st part of the tute on both layers. For the alpha component, you want to remove the blurred edges. To do this, I usually go Image>Adjustments>Threshold to the whole image. Sometimes, you have to play around with the amount of threshold used, as it can sometimes look shit in game. Also, sometimes its best to adjust the threshold on individual mip levels. This image shows a comparison between the threshold and non-threshold images. I only did it to the first five levels. As you can see, the upper half has sharp edges, the lower half is blurry:
6) Once your happy with both of the alpha and texture mips, flatten both images. Copy the alpha mip image. Go to the texture, and add an alpha mask (select the texture layer, then go to the bottom of the texture list, and click on the rectangle with a circle on it). Alt+click on the alpha mask (this will result on the image going white). Paste your alpha mip in there. Click on the texture layer, and voila, the alpha and texture mips are combined! The following picture shows the final product, plus where some of the features mentioned above are located:
7) Save it, and make the .info file as described before.
----------------------
[center]QUESTIONS?????[/center]