It has some tips for both beginner and experienced skinners.
Alright, let's go!
Step 1 - Bike decision and plastic flow
Decide what bike you want to skin, and find a good PSD template for it.
It's good to look at the bike's plastic flow to see where things go, this will make your graphic flow better since your PSD template is flat.
Step 2 - Creating the cutout
Whether you have a fast computer or not, I personally like to work from a cut out. My Photoshop will work at rocketspeed and there is nothing else going on than just the graphics. Here's a step by step tutorial to create one (some templates already have them).
- Delete EVERY layer except for the cutout,plastics, shading,normal map and graphics folder(if there's no graphics folder, create a new one)
- Right click the thumbnail of the cutout layer and click 'select pixels'
- Now click on your graphics folder and click 'add layer mask' (you can find it under the layers panel, it's a square with a cirkel symbol)
- Now save the PSD file as a different name! Don't overwrite your current one.
Now you can draw what you want within the graphics cutout, it's super handy!
Step 3 - Creating shapes
I usually start my graphics with the main sponsor. This will be the biggest logo on the shroud and it takes up alot of space.
Smack that logo on there and start working your design around it. This will make the dimensions of your shapes flow with your main logo.
Creating shapes can be done in many ways. Some like to use the pen tool, some like to use the polygonal lasso tool.
For rectangle-like shapes, I like to use the rectangular marquee tool. This way you will always have parallel lines for your rectangular shapes.
Your biggest key is to stay with one design. Do NOT go crazy and try to stick with one direction. Throwing multiple directions into one design will throw the flow of your graphics off and it will look silly.
Work your way up, and design it shape by shape, erase things you don't like and keep working on it until it's to your likings.
Tip: Toggle on your normal map to see the depth of the plastics. This is super handy when working on the front and back fender!
Step 4 - Adding logo's
Most important is finding your logo's. The best way to find logo is: google 'logo name logo eps' (for example: rockstar logo eps). Both EPS and AI files can be opened with Photoshop and your logo's will look alot sharper than a 250 x 300 px jpg image from google images.
If you can't find your logo,try to re-create it in Photoshop in a 3k by 3k px document. Even better is to re-create it in Illustrator if you're familiar with Illustrator.
Step 5 - Spot and erase mistakes
When you're happy with your result, it's time to test it. Save your graphics as WhateverNameYouLike.png in your folder.
Find the JM's of your bike (they usually come with the .psd) and name 'WhateverNameYouLike.png' after the JM's.
EXAMPLE: JM is called: yz250f_frame-2015 then your skin should be called: yz250f-2015-WhateverNameYouLike.png
Look ingame for mistakes and parts you don't look, go back, erase them or add stuff. Do this back and forth until you are happy with your result.
Step 6 - throwing it on your main template
Now, erase every layer except for your graphics folder. Then save your graphics as a .png.
Open up your main template, and zoom out until the whole template is visible. Then, drag your graphics.png on top of your template.
If you did it right, your graphics should fit on the plastics right away, if not, make them fit by dragging them with your mouse and arrow keys.
After it fit's you can save them as a .png and do the same as step 5. Don't forget to do the same with your normal and spec maps!
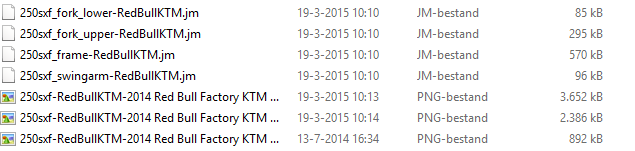
This is what your folder should look like: