Automatic decal placement script/program for environment)
Posted: Wed Apr 22, 2015 5:01 pm
Hey guys!
So I've been a while back I got kind of annoyed with the placing of decals over large areas, like doing a whole environment in grass. It's especially 2 things that are annoying when decalling the environment. 1. It takes a lot of time. 2. It often overlays each other so you will end up with x times more decals than what's needed to cover the area, so I went ahead and tested my web/programming skills.
This script/program comes in three options! 2 of them are "simple" and 1 is advanced. The simple ones are the same, but 1 is online where you enter the code and then the webpage returns the code you entered, the other one does the same thing, except it's an .exe file that you can download and use offline. Instead of returning it in a webpage, it creates a .txt document that has all the same code in it as the webpage would.
Following will be a guide on how to use each script!
The Simple online script
This script can be found at http://mxsimtools.storkenmxs.com/ and then go to the simple one, or directly go to http://mxsimtools.storkenmxs.com/basicdecalplacing.php.
1. When you enter the site, it will look like this:
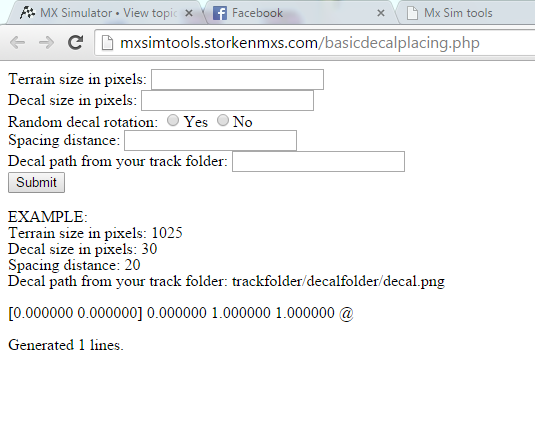
2. Fill out the fields.
Not sure what each of them are for? Here's an explanation.
Terrain size in pixels: Assuming you want to cover the whole track, this option is supposed to the same as the length of 1 side of the map. If you go into editor mode, and hold the mouse in the bottom right corner, where the map ends, you will get 2 coordinates. Either they will most likely be 1025x1025 or 2049x2049. That is the value you want to enter, in my examples, I use 2049.
Decal size in pixels: This is how big the decal is supposed to be ingame. Typical ontrack decals are around 30, but the environment usually doesn't have to be the same quality, so a little higher, maybe 50, will often be good to use.
Random decal rotation: If this is yes, it will output decals in random rotation, if no is selection, they will be at rotation 0.
Spacing distance: This is the distance between each decal. Note that the decals coordinates it at the center of the decal. A good value to aim at is about half of the value that your "Decals size in pixels" is. This will place one decal at start, then the next one is "Spacing distance: value" away from the first one. The next one will be as far away from the 2nd as the 2nd one was away from the first one and so on. This goes for both x and y axis.
Decal path from your track folder: Assuming you are in your personal folder, you first want to type your tracks folder name. Let's say mine is "cooltrack". Then you want to enter eventual subfolders, for my example, I'll have the subfolder "decal". At last in my folder "decal", there is the decal "sand.png". In this example, my entered text would look like: cooltrack/decal/sand.png
Now it's just to submit!
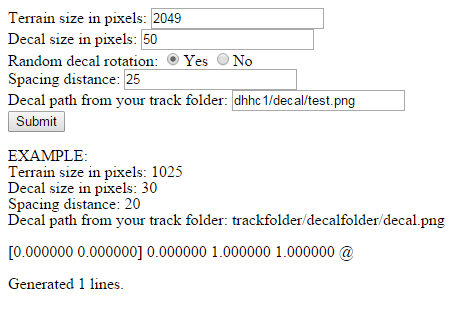
This is what it could look like once filled out:
The output will look something like this after you've clicked submit:
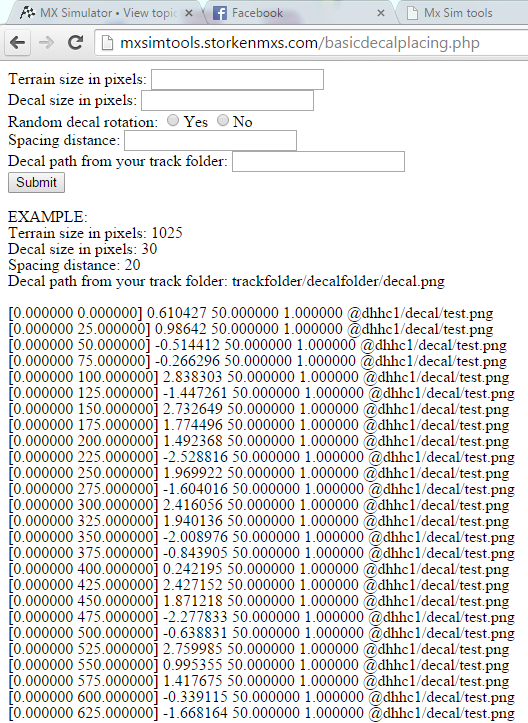
3. Selecting the output.
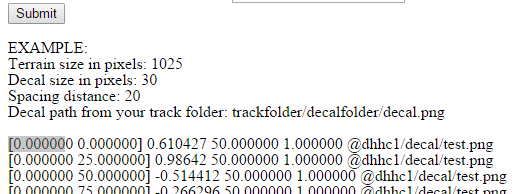
When you've hit submit, you are supposed to get a large output, easiest way to select this is my selecting the first or first few characters in the output like this:
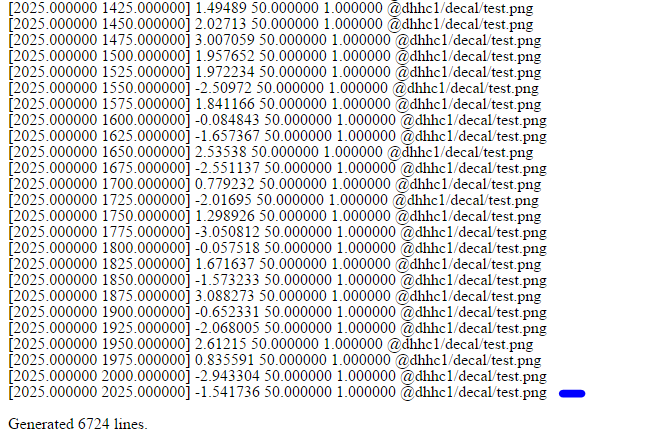
After that's done, scroll down to the bottom (using the scroll-bar at the side of the page or the button labeled "end" to get to the end of the page. It will most likely be a few thousand lines of output so regular scrolling will take time). Once you've reached the bottom, hold shift an click right after the last character of you output, where the blue line is in this image:
4. Once it's all selected, either right click and choose "copy" or press "ctrl + c".
5. Open up the decal file for your track
If you place the copied code on top of the decal file, the decals will appear at the bottom on your track.
If you place the copied code on the bottom of the decal file, the decals will appear at the top on your track.
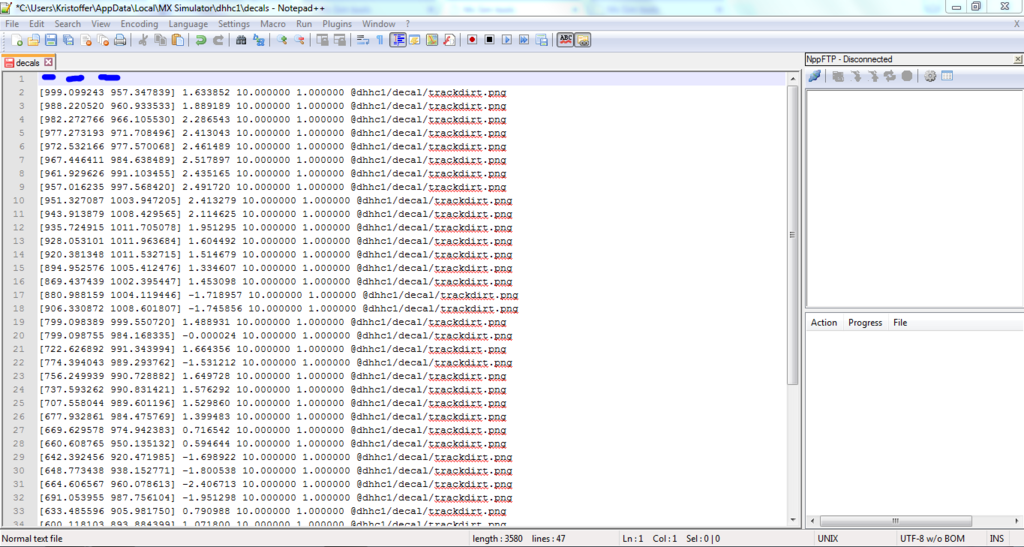
Most likely you want to have them on the bottom, covering the tilemap and to fill out the environment. Then make sure to have a blank line on the top of your decal file, like this (where the blue lines are at):
Now paste the code you copied on that blank line on top, either by right click and choose "paste" or press "ctrl + v".
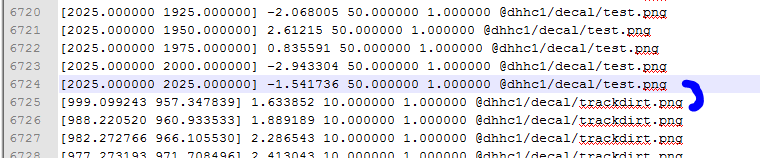
You should now end up at a line quite a bit down the document like this (the blue curve is where the newly pasted code ends and the old one starts);
Save up, and start your track, it should now have a nice layer on the bottom with your decals you chose.
The Advanced online script
For the options that are same as the simple script, check those descriptions.
This script can be found at http://mxsimtools.storkenmxs.com/ and then go to the simple one, or directly go to http://mxsimtools.storkenmxs.com/advanceddecalplacing.php.
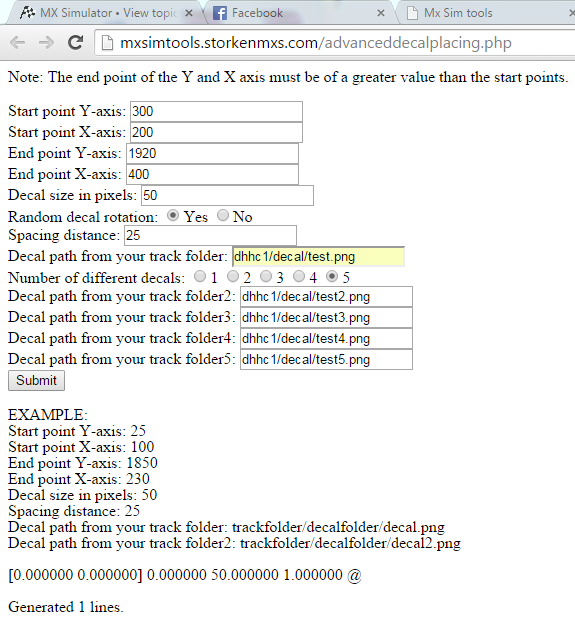
1. When you enter the site it will look like this:
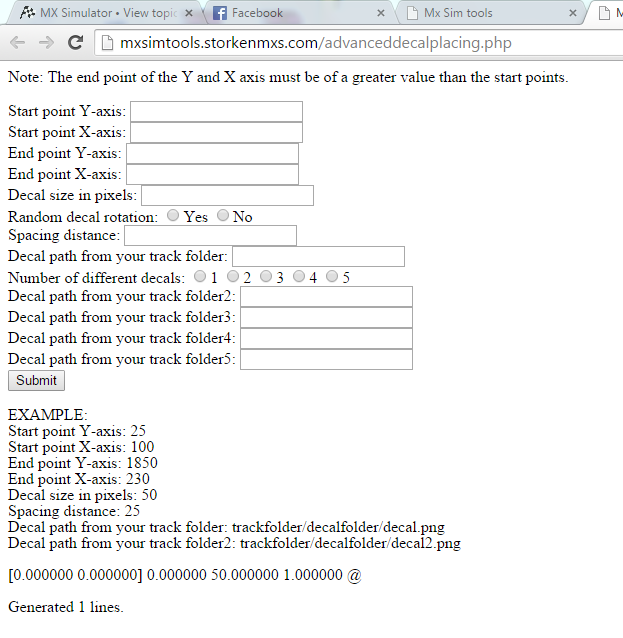
Fill out the fields!
Start point Y-axis: Where in the Y axis you want the decals to start covering.
Start point X-axis: Where in the X axis you want the decals to start covering.
End point Y-axis: Where on the Y axis you want the decals to stop covering.
End point X-axis: Where on the X axis you want the decals to stop covering.
Number of different decals: Some more advanced users like to use different decals for the environment, to change things up and not have the environment in one tone.
Decal path from your track folderX: This is exactly the same as the other one, except these are for the extra decals.
Note: It's a random function that randomly chooses which decal that is going to be in the output. If you choose that you want to have 4 decals, but only enter 3 of them, you will end up with a few blank lines. If you enter 4 different but select that you only want to have 3 different, the last decal won't be in the output code.
An input can look like this:
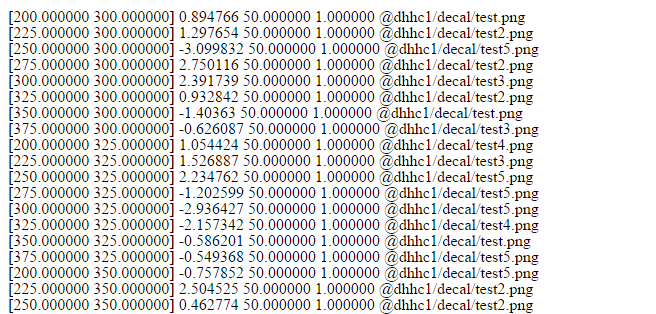
As you can see with the new output, it starts at the coordinates we entered and it prints out the different decals we entered as well.
Applying the code is the same as for the basic one!
The Basic Program
This program can be downloaded at: http://storkenmxs.com/files/DecalPlacing_1-00.rar
1. When you launch the program, it will look like this:

2. Just enter the values as you do with the simple online script! This is what an input can look like:
NOTE: The last line "Tryck ned valfri tangent för att fortsätta..." means "Press any key to continue" (it's Swedish... My laptop language is Swedish...). After you click enter after you've put in your folder path, the program will automatically proceed to make a file with the output in it.
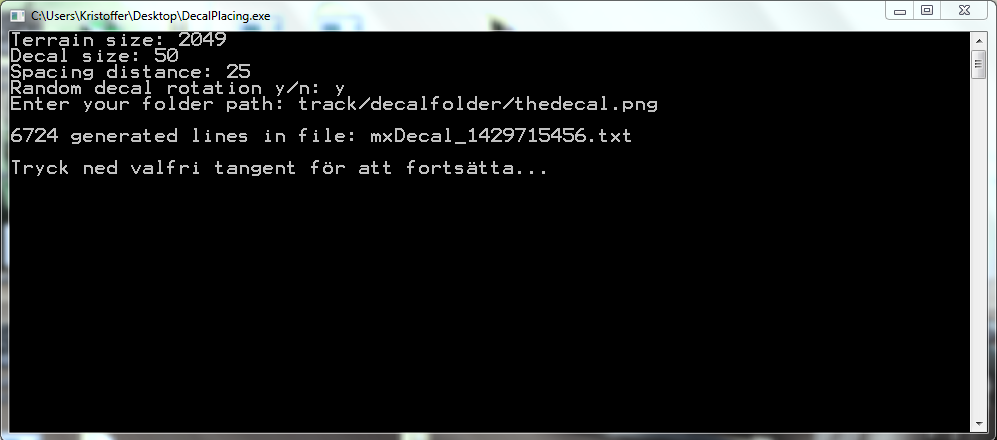
The .exe file should now have created a output file (in the same directory that the .exe file is in) that looks something like this one:
If you open that file it will look something like this:
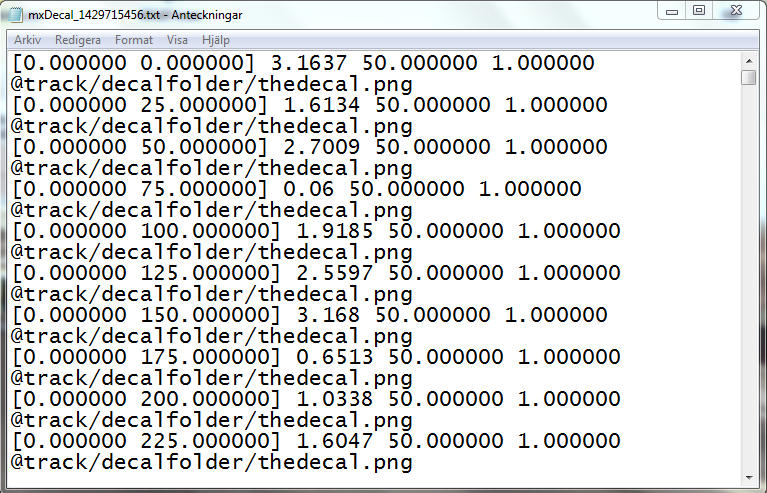
Select all by pressing "ctrl + a" then copy everything and paste it into your decals file for your tracks, as you do in "The Simple online script".
If you find any bugs, please make a comment or pm me, or if you have any other feedback!
If you use this or find it useful, leave a comment and let me know!
Hope you all can use this and that it works as it's intended to!
So I've been a while back I got kind of annoyed with the placing of decals over large areas, like doing a whole environment in grass. It's especially 2 things that are annoying when decalling the environment. 1. It takes a lot of time. 2. It often overlays each other so you will end up with x times more decals than what's needed to cover the area, so I went ahead and tested my web/programming skills.
This script/program comes in three options! 2 of them are "simple" and 1 is advanced. The simple ones are the same, but 1 is online where you enter the code and then the webpage returns the code you entered, the other one does the same thing, except it's an .exe file that you can download and use offline. Instead of returning it in a webpage, it creates a .txt document that has all the same code in it as the webpage would.
Following will be a guide on how to use each script!
The Simple online script
This script can be found at http://mxsimtools.storkenmxs.com/ and then go to the simple one, or directly go to http://mxsimtools.storkenmxs.com/basicdecalplacing.php.
1. When you enter the site, it will look like this:

2. Fill out the fields.
Not sure what each of them are for? Here's an explanation.
Terrain size in pixels: Assuming you want to cover the whole track, this option is supposed to the same as the length of 1 side of the map. If you go into editor mode, and hold the mouse in the bottom right corner, where the map ends, you will get 2 coordinates. Either they will most likely be 1025x1025 or 2049x2049. That is the value you want to enter, in my examples, I use 2049.
Decal size in pixels: This is how big the decal is supposed to be ingame. Typical ontrack decals are around 30, but the environment usually doesn't have to be the same quality, so a little higher, maybe 50, will often be good to use.
Random decal rotation: If this is yes, it will output decals in random rotation, if no is selection, they will be at rotation 0.
Spacing distance: This is the distance between each decal. Note that the decals coordinates it at the center of the decal. A good value to aim at is about half of the value that your "Decals size in pixels" is. This will place one decal at start, then the next one is "Spacing distance: value" away from the first one. The next one will be as far away from the 2nd as the 2nd one was away from the first one and so on. This goes for both x and y axis.
Decal path from your track folder: Assuming you are in your personal folder, you first want to type your tracks folder name. Let's say mine is "cooltrack". Then you want to enter eventual subfolders, for my example, I'll have the subfolder "decal". At last in my folder "decal", there is the decal "sand.png". In this example, my entered text would look like: cooltrack/decal/sand.png
Now it's just to submit!
This is what it could look like once filled out:

The output will look something like this after you've clicked submit:

3. Selecting the output.
When you've hit submit, you are supposed to get a large output, easiest way to select this is my selecting the first or first few characters in the output like this:

After that's done, scroll down to the bottom (using the scroll-bar at the side of the page or the button labeled "end" to get to the end of the page. It will most likely be a few thousand lines of output so regular scrolling will take time). Once you've reached the bottom, hold shift an click right after the last character of you output, where the blue line is in this image:

4. Once it's all selected, either right click and choose "copy" or press "ctrl + c".
5. Open up the decal file for your track
If you place the copied code on top of the decal file, the decals will appear at the bottom on your track.
If you place the copied code on the bottom of the decal file, the decals will appear at the top on your track.
Most likely you want to have them on the bottom, covering the tilemap and to fill out the environment. Then make sure to have a blank line on the top of your decal file, like this (where the blue lines are at):

Now paste the code you copied on that blank line on top, either by right click and choose "paste" or press "ctrl + v".
You should now end up at a line quite a bit down the document like this (the blue curve is where the newly pasted code ends and the old one starts);

Save up, and start your track, it should now have a nice layer on the bottom with your decals you chose.
The Advanced online script
For the options that are same as the simple script, check those descriptions.
This script can be found at http://mxsimtools.storkenmxs.com/ and then go to the simple one, or directly go to http://mxsimtools.storkenmxs.com/advanceddecalplacing.php.
1. When you enter the site it will look like this:

Fill out the fields!
Start point Y-axis: Where in the Y axis you want the decals to start covering.
Start point X-axis: Where in the X axis you want the decals to start covering.
End point Y-axis: Where on the Y axis you want the decals to stop covering.
End point X-axis: Where on the X axis you want the decals to stop covering.
Number of different decals: Some more advanced users like to use different decals for the environment, to change things up and not have the environment in one tone.
Decal path from your track folderX: This is exactly the same as the other one, except these are for the extra decals.
Note: It's a random function that randomly chooses which decal that is going to be in the output. If you choose that you want to have 4 decals, but only enter 3 of them, you will end up with a few blank lines. If you enter 4 different but select that you only want to have 3 different, the last decal won't be in the output code.
An input can look like this:

As you can see with the new output, it starts at the coordinates we entered and it prints out the different decals we entered as well.

Applying the code is the same as for the basic one!
The Basic Program
This program can be downloaded at: http://storkenmxs.com/files/DecalPlacing_1-00.rar
1. When you launch the program, it will look like this:

2. Just enter the values as you do with the simple online script! This is what an input can look like:
NOTE: The last line "Tryck ned valfri tangent för att fortsätta..." means "Press any key to continue" (it's Swedish... My laptop language is Swedish...). After you click enter after you've put in your folder path, the program will automatically proceed to make a file with the output in it.

The .exe file should now have created a output file (in the same directory that the .exe file is in) that looks something like this one:

If you open that file it will look something like this:

Select all by pressing "ctrl + a" then copy everything and paste it into your decals file for your tracks, as you do in "The Simple online script".
If you find any bugs, please make a comment or pm me, or if you have any other feedback!
If you use this or find it useful, leave a comment and let me know!
Hope you all can use this and that it works as it's intended to!